Tuesday, November 30, 2010

Another Stamp-Carving Tutorial

I cannot believe I missed this very nice stamp-carving tutorial when I was looking for just such a thing.  Gennine's Art Blog is one of my happiest places to visit.  I have her December desktop calendar on my desktop.  I have always liked bird pictures, and hers are some of my favorites EVER! Check out the stamp-carving tutorial:


Thursday, November 18, 2010

Hooky


This week we had our usual IEW lesson (you go, Keisuzi!).

Then we packed up our picnic lunches and crossed the fence in our backyard to have PE and picnic on the Cross Florida Greenway.

It was lots of fun.  Though the day was pretty overcast, we enjoyed ourselves.


We are playing disc golf.  The "hole" is off camera.


We collected a few treasures.


I didn't take pictures of the collection of animal bones or the collection of shell casings.  Now I know for sure - it's not always firecrackers being set off on the Greenway - sometimes it is target practice. 

We saw several gopher holes.


After lunch, we planned to go back to the house for Science and Art.


But Science time came and went.


And then Art time came and went.


And somehow, Recess never ended.


We tuckered them out!


Friday, November 12, 2010

Carving on...

The Sm'Arties have loved using carving tools to make our own stamps.


This week we carved stamps that had a Florida theme so we could make Artist Trading Cards (ATCs) that reflect our environment.

 I am still loving the oval erasers from Dollar Tree 

Some of the designs are original; some are based on clipart. 

The kittycat face is based on a design on pajama pants!


I had some tired, used legal-size manila folders - they make great placemats.  You can draw on them, stamp on them, and then pull them out to use again.

Hmmm...I think Earthgirl may be coloring all over her Science homework...

See the one at top right?  See the fossil under ground?  Pretty cool!

We are ready to trade!


Tuesday, November 9, 2010

Special Valentine to Science Geek

At the end of last week's SmArties class, I showed Science Geek these little Dollar Tree erasers.  When I got these, Earthgirl and I decided to NOT use them to carve randomly, but to use the designs to make stamps. I got 2 packs, but think I'll go back and spend another $2.  You can see the heart/flower one on the left?  I carved it out quickly, using just an Exacto knife and a metal pencil end.

 It makes a cute little flower-in-heart handmade-looking stamp.  We may do some of these at Earthgirl's Almost-Annual Girls' Christmas Crafts Party.  Now, look above at the "I heart U" eraser.  I said to SG, "Look how cute these are!  I'm going to carve this one!"  And she said, "Hmmmm...but wouldn't that make a backwards image?"  HA!  After laughing at the children for making backwards images, look what I was about to do!  We kinda held on to each other laughing at ME.


 OK, so THANK YOU, Science Geek!  I transferred the image to the back side


So this is for you, Science Geek:
I heart U, Science Geek. 
Love, K-Sue

Sunday, November 7, 2010

Making Our Own Rubber Stamps

We are carving erasers into rubber stamps, and then stamping all over the place!

Here are a few places I visited to educate myself before jumping in with the Sm'Arties:

Letterboxing Kids

Stamplovers Only

Ruthann's

Obsessively Stitching

Abigail's How-To


The Craft Junkie

Eraser Arts and Crafts Projects - This site has links to a BUNCH of other sites with little fun eraser-related projects. 


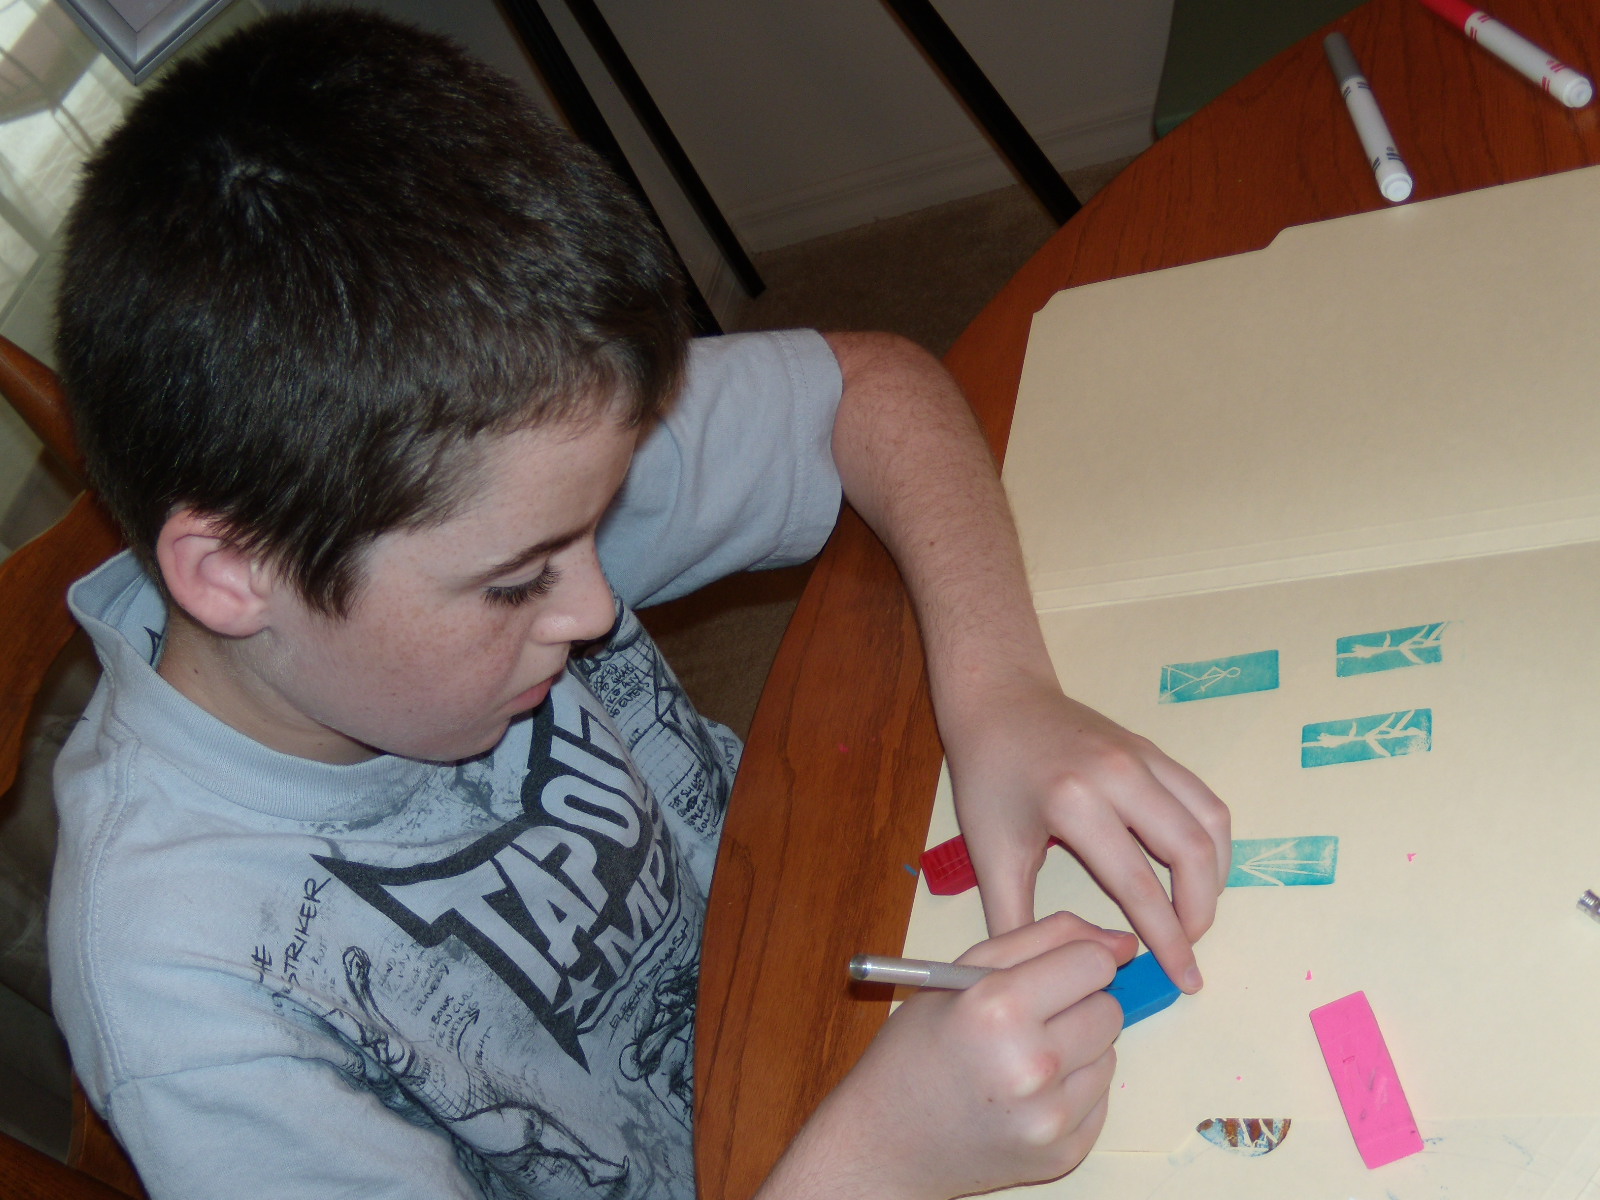
What we used:  Dollar Tree erasers!  We had some rectangular ones and these ovals.  The ovals are my favorites, because you can use the pretty oval outline.


I brought just a few tools for carving - Exacto knives, Stabilo carvers, and metal pencil ends (where I pull our the eraser), one still rounded; the others crunched into a gouge.  The Stabilo carvers are my favorite - what a difference! Since I only have 2 handles, I just wrapped the ends of the extra blades in Bandaids and we gouged away.


My intent was that the children just carve a bit on the first erasers, just to see how it felt, but they all started carving designs so fast I could not keep up!  Before I could talk of how to transfer designs and about mirror-imaging, little trees and stick-figures appeared!


And Jackson proudly showed off his "Jax" stamp.  Only thing is, he didn't realize that when you stamped it down...

...but then he got the hang of it.  In spite of seeing the lesson from the "Jax" stamp, other Sm'arties had trouble with the whole backwards-mirror image thing - mind-blowing!


I brought along some clipart of Florida images - a palm, and alligator, a sea turtle...


You can use a stamp pad or markers with rubber stamps.


I love the skateboard dude!

Shark attack!

Here is a palm I did, colored with markers, then stamped on a blue ink pad.  I love how it turned out in the oval